
AC3.1. Size and Scale of the Sun

Investigation 3.1
Materials:
- One of the image processing (IP) apps listed for A Changing Cosmos on the GSS software page.
- Images: Use “3SizeAndScale” images from
jpg image set for A Changing Cosmos or
HOU03size_scale.zip (includes eclipse1.fts, hemma.jpg, jupiter.fts, moon.fits, ringnebula.fts, fireballShoemakerLevy.fts, fireballShoemakerLevy2.fts)
I. How Big is that Prominence?
a. Use Image Processing app/software to open the image eclipse1.fts.
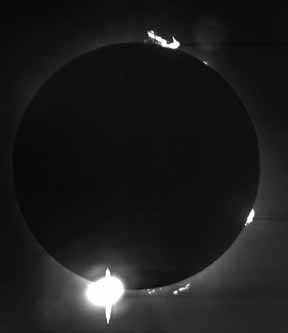
This image of the longest total solar eclipse* of the 20th century was taken in Hawaii in 1991 by an HOU team. Look around the rim of the Sun (often called the limb of the Sun) and see if you can find prominences—cloud-like or flame-like structures extending into the corona of the Sun (the Sun’s atmosphere). A prominence forms in a time period of about a day, but stable ones can last many days or even months. The bright eruption at the bottom of the eclipse1 image is an example of a prominence.
b. Try some colors from Image > Lookup Tables such as red/green, fire, ice, spectrum, …. Adjust the contrast using Min/Max so you can see the Sun’s rim.
The big bright blob with the “spike” sticking through it is probably not a prominence. It’s more likely a feature of a total solar eclipse called the diamond ring effect, which happens either right at the beginning or end of totality (totality is when the Moon completely obscures the disk of the Sun). A tiny piece of the Sun’s surface is shining through and over-exposing some of the CCD pixels.
c. Find the prominence that is nearly on the opposite side of the Sun from the diamond ring blob and zoom in on it to get as large a display of the prominence as possible that still fits on the screen (with no scroll bars on window).
d. Using the cursor and the Pixel Coordinates, find the height in pixels of the prominence above the Sun’s rim. Also find the diameter of the Sun.
e. Use the fact that the Sun’s diameter is 1,390,000 km to compute height of the prominence in kilometers.

View a partial or total solar eclipse
To see a solar eclipse, you usually have to travel to a place where the path of the Moon’s shadow sweeps across the Earth. See the Solar Eclipses page of the Pacific Planetarium Association or the Time and Date Eclipse page to the eclipse paths and more information. One way to observe a solar eclipse safely is to use a proper solar filter. See how to Make Partial Solar Eclipse Viewing Goggles.
3.1. How many Earths could fit under the prominence? (Earth’s diameter = 12,756 km)
f. Another way to measure size in the image is to use the Plot Profile tool, located under the Analyze menu. Draw three lines using the Line (“Straight Line Selection”) icon in the toolbar: one across the prominence to show its width, one from the edge of the Sun to the highest point of the prominence to show its height, and a third line all the way across the Sun. Click “Plot Profile” after each line is drawn. Note that the length of the line is displayed in the yellow Status bar, next the the values of the (x,y) coordinates, and also in the graph generated by the Plot profile tool (x axis). Be sure that your lines include parts of the image beyond the prominence.
g. Make a sketch of the three graphs you generated with the Plot Profile tool. Now, arrange the graph windows so that the graphs, the yellow Status bar, and the image window are all visible on the screen. Select one of the graphs, and click on a point on the line. Note that the coordinates of that point appear in two places, beneath the graph in the graph window, and in the yellow Status bar. Note also that a small yellow circle appears at the corresponding point on the line that you drew in the original image file. If you cannot see any of this on your screen, reposition your windows so that everything will be visible. Try moving your cursor to a different point on the graph line, and notice how the yellow circle on the image moves to a corresponding place on the original line.
Drag the cursor to a place on the graph corresponding to what you believe to be the left or outside edge of the prominence. In the image window does the small yellow circle showing where you are along the slice also appear to be at the edge of the prominence? Often the two do not match.
h. Using the “Brightness & Contrast” tool, increase the value for Max until the prominence almost whites out. Make another graph with the Plot Profile tool.
3.2. Compare these two graphs. What is different? What is the same? What is the distance in pixels between the apparent edge of the prominence in the image and the edge shown on the graph?
* To see a solar eclipse, you usually have to travel to a place where the path of the Moon’s shadow sweeps across the Earth. See the Solar Eclipses page of the Pacific Planetarium Association or the Time and Date Eclipse page to the eclipse paths and more information. One way to observe a solar eclipse safely is to use a proper solar filter. See how to Make Partial Solar Eclipse Viewing Goggles.
II. Measuring Plate Scale of an Image
Each pixel on a CCD image, e.g. of the Sun, represents a very small portion of the sky and is colored or shaded to represent the amount of light received through the telescope from that part of the sky. The entire sky is like a 360° sphere surrounding us, and the field of view of the telescope covers a tiny angle on that sphere with each pixel of the CCD covering an even tinier angle in the sky. That angle determines a quality known as the plate scale of telescope-CCD system. The pixel angles are very small: seconds of arc (see box “What is an angle of 1 arcsec?). For instance, for a certain CCD camera on the 30-inch telescope at Leuschner Observatory near Lafayette, California, where most of the images for our investigations were taken, the plate scale was 0.99 arcsecs/pixel. Each pixel on those images is nearly 1 arcsec/pixel in angular size. When we got a new CCD camera to put on the 30-inch telescope, the plate scale of the new system became 0.67 arcsecs/pixel. With that new system, each pixel on the image is 0.67 arc seconds in the sky.
Using Angles to Measure Size: The Small Angle Approximation
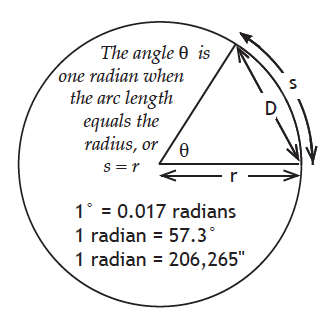
The angle covered by an object depends on both its actual size and the distance to the object. Consider the diagram at right that shows a circle with radius (r) representing the distance between the observer and an object. The width (or size) of the object is D, and θ is the angle subtended by the object. The arc length subtended by the object is s. The arc length of a full circle is the circumference (2πr). The angle θ may be expressed in degrees, which most people are familiar with. But another unit of angle is the radian. The angle θ is one radian when arc length s = radius r, or s = r.
Since 360° = 2π radians, that means
1° = 2π/360 radians = 0.017 radians
and conversely,
1 radian = 57.3° = 206,265”
The relationship between s and r can be written more generally in terms of any angle θ that is measured in radians:
s = r x θ when θ is measured in radians.
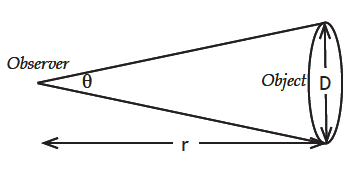
As θ becomes smaller, the arc length s has less curvature and can therefore be approximated by a straight line of length D. When θ is much less than 1 radian, the lengths of D and s become almost equal, which gives us the Small Angle Approximation:
D = r x θ or θ = D/r
where r is the distance away from the object, D is the size of the object in the same units as r, and θ is the angle in radians.
You need to be very careful to keep your units of measurement straight when working with plate scales and the Small Angle Approximation. In order to measure sizes of the objects on CCD images, there are four steps:
1) Measure the number of pixels covered by the object.
2) Use the plate scale for the image to calculate the actual angle in the sky covered by the object.
3) Convert this angle to radians.
4) Use the Small Angle Approximation to calculate the size of the object given its angle in radians and distance away.
Find Plate Scale of eclipse1
In the image eclipse1 of a solar eclipse in 1991, the angle covered in the sky by both the Sun and the Moon is 1/2°.
a. Use cursor readings in the yellow Status bar or use Plot Profile under the Analyze menu to measure the number of pixels across the width of the Moon in the image.
b. Calculate the ratio of the angle covered by the Moon in the sky when looking at it with your naked eyes to the number of pixels covered by the Moon in the image. This is the plate scale of this image in units of degrees per pixel.
c. Plate scales of CCD images are commonly expressed in arcsecs/pixel. Use the conversion factor, 1 degree = 3600” (A double quotation mark, “, is the common symbol for arc seconds) to calculate the plate scale of the image of the eclipse in arcsecs/pixel.
III. Measuring Size on a CCD Image
Open image hemma.png or hemma.gif.
The image is of Hemma, an HOU student/assistant, sitting at her computer. You can use the Rotate option under Process to make the image right side up. If your computer is slow, rotating it may take a few minutes.
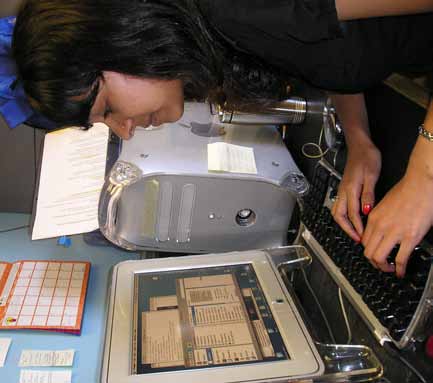
Astronomers usually look at astronomical images where you can’t tell which way is sideways. For this Earthly image, you may want to use the rotate function of your Image Processing software…or not.
a. Use cursor readings in the Pixel Coordinates to determine the number of pixels in the width of the screen on Hemma’s computer.
b. Given the following data:
The height of the active area of Hemma’s screen = 9.5 inches
The distance of the camera from the screen = 36 inches
…use the Small Angle Approximation to calculate the angle covered by Hemma’s screen as observed by the camera. (See the Measuring Size with Images Discussion Sheet for an explanation of the Small Angle Approximation). This angle is rather large for the Small Angle Approximation but will suffice for this activity.
c. Calculate the plate scale of the hemma image in arcsecs/pixel. (1 radian = 206,265”)
IV. Measuring the Size of Astronomical Objects
In this activity, you may first need to do some image processing (using the brightness/contrast/Min/Max adjustment) to make sure you are measuring the entire width of the object.
Open the following images one at a time and
a. find the object width or length in pixels
b. use the plate scale to calculate the angle in arcseconds
c. use the distance to find the actual size, assuming small angle approximation applies.
A. moon.fts Object: any one of the craters
Plate Scale: 0.45”/pixel
Distance to the Moon: 3.84 x 10⁸ m
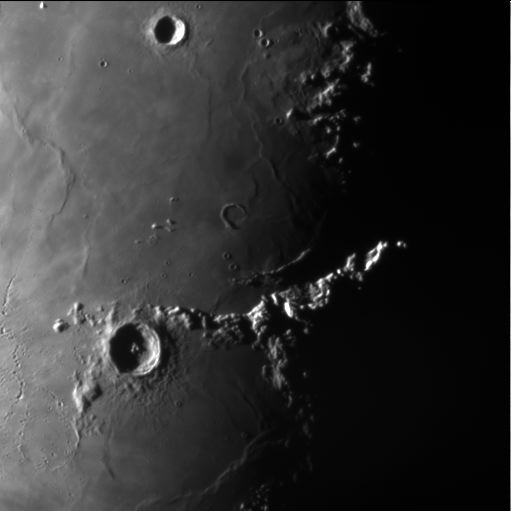
3.3. Could a house fit inside this crater? Your city or town?
B. jup1.fts Object: Jupiter
Plate scale = 0.45”/pixel
Average distance to Jupiter = 7.8 x 10¹¹ m
3.4. How many times bigger is Jupiter than the moon crater you measured?
C. eclipse1.fts Object: Sun
Plate scale = 3.0”/pixel
Average distance to the Sun = 1.5 x 10¹¹ m
3.5. How does the size of the Sun compare with the size of Jupiter?
D. ringnebula.fts Object: the Ring Nebula M57
(a planetary nebula; gas from a dying star)
Plate scale = 0.63”/pixel
Distance = 2,300 light years (ly)
You need to convert the distance to the Ring Nebula from light years to meters:
1 ly = 9.5 x 10¹⁵ m.
3.6 How does the width of the Ring Nebula compare to the Earth-Sun distance?
E. m51.fts Object: M51, a spiral galaxy
Plate scale = 0.99”/pixel
Distance to the galaxy M51 = 30 million ly
3.7a. How wide are the spiral arms in light years?
3.7b. How wide is the entire galaxy?
3.7c. How does this compare to the width of the Ring Nebula?
Extra Challenge:
Determine the field of view for one of the images used in this section (IV). The field of view is the angle covered by the entire image.