
DEW3.1. Observe Changing Vegetation
Leaves and flowers have a dynamic life – if you have time to watch. Taking photographs over a period of time and making a time-lapse movie is one way to begin to appreciate the stages leaves and flowers pass through.
Adopt a Leaf: Make Time-Lapse Videos
This video of of the budburst of a Silver Maple—the first stage of a flower—was created by Elizabeth Wylde, Friends of the Fresh Pond Reservation, Cambridge, MA. She used the application QuickTime Pro, which is no longer supported by Apple, but there are a number of apps for computers or mobile devices that are capable of making time-lapse series of photos.

Tips:
- Put a blank piece of cardboard, possibly white or light gray, behind the leaf to make it easier to see the leaf.
- Consider writing the date on the cardboard or adding the date to each picture using image processing software.
- Stand on the same side of the leaf to take pictures.
- Try to take pictures during the same time of day to keep the light angle as constant as possible.
- Mark your leaf with a colored piece of string gently wrapped around the stem.
PicturePost
In order to get the same view with each picture, consider using a tripod with its position carefully marked to always be the same.
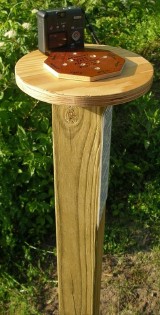
The deluxe way to do this is to make a PicturePost.
Pictures of the same location provide a wealth of information and data to monitor changing environmental conditions. The United States Geological Survey (USGS) has research projects devoted to “repeat photography“, such as documenting Mojave Desert Ghost Towns and Mining Sites.
Setting up the camera to take photographs of the same location can be time consuming, and it is not practical to leave the camera in the field, waiting to take the next photograph. A picturepost is a stable platform for people to use with their digital cameras to take repeat photographs of not just one scene, but the complete 360 degree landscape in less than a minute. The official Picture Post website was hosted by the University of Oklahoma [was https://picturepost.ou.edu/index.jsp]. Instructions for how to make one was there under the Resources > Build menu item.
This PicturePost has an octagon that allows for a digital camera to be quickly positioned for eight different views to make a 360 record of a landscape.
Adopt a Branch:
Analyze Leaves of Different Ages
Created by Lauri Twitchell from the University of California Botanical Garden, Berkeley, CA.
In February, 2005, Lauri attended a Measuring Vegetation Health (MVH) workshop at the Lawrence Hall of Science in Berkeley. On the third day, attendees were encouraged to create their own project using MVH concepts and tools that they could use in their science center.
One of the aspects that is so exciting about Lauri’s project is that by photographing this time series of leaves as one image, the lighting for all leaves was constant. This allowed for rapid comparison of the leaves using MVH software. Also, Lauri pulled from the plant shortly before the photograph, which minimized any drying effects on the leaves.
The activity below has been adapted for DigitalImageBasics software.
Introduction to Leaves on Branches
The leaves on a single branch are of a range of ages. Some have just opened, others are mature and fully photosynthesizing, and others appear to be past their productive stages and will be discarded by the plant. Can we see differences in the light reflected from these leaves of different ages?
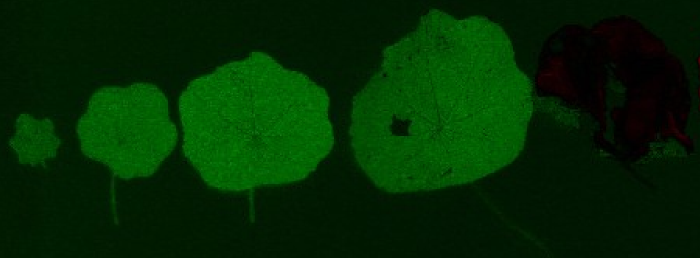
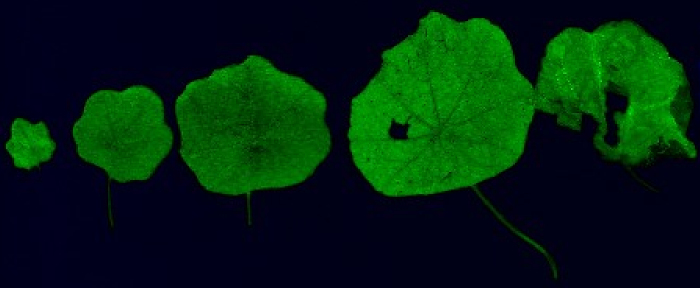
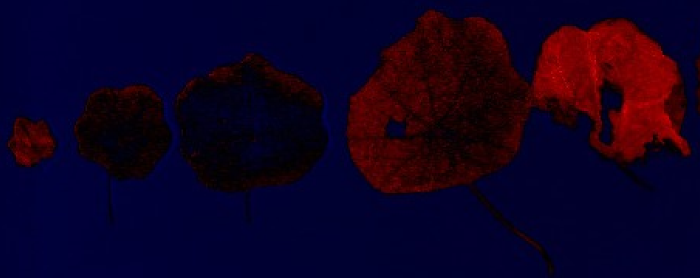
Visible Colors
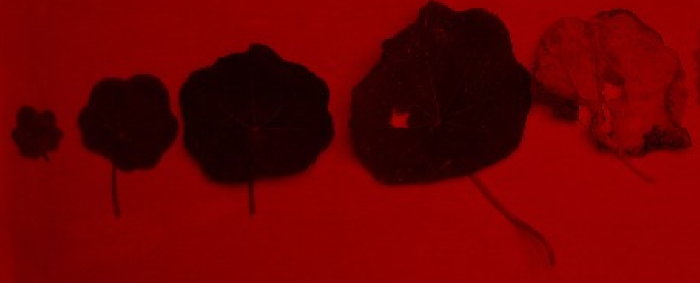
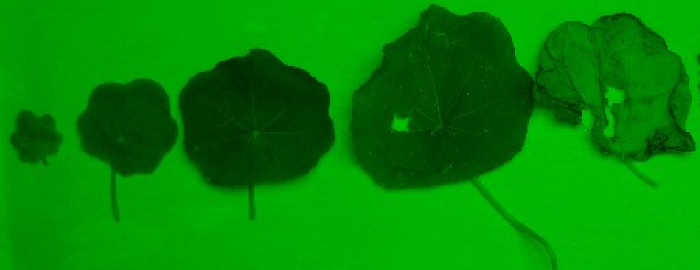
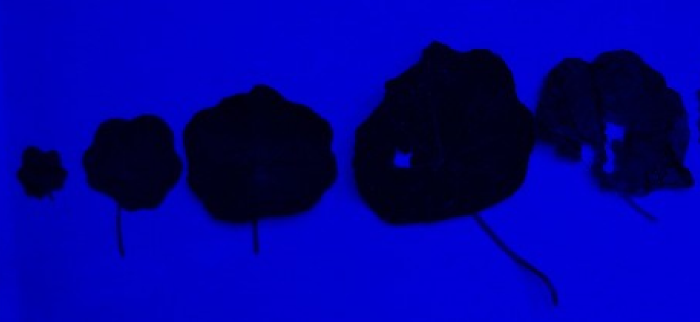
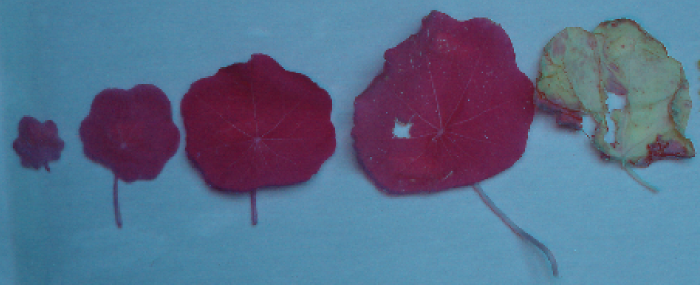
This is a color photograph of the leaves on a branch or stem of a nasturtium, a flowering plant. The newly opened leaf is on the left, and each leaf to the right being older than the one on the right. The oldest leaf is on the far right.

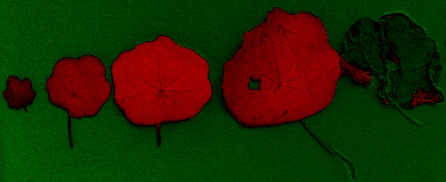
Using the DigitalImageBasics software, the red, green, and blue layers of the Nasturtium photograph are displayed separately (the darker the color represents little of that color being reflected from the surface of the leaf; the brighter the color, the greater reflectance of the color from the leaf):
Use AnalyzingDigialImages to compare the layers of colors within the color photograph. The formula is
(Intensity A – Intensity B) / (Intensity A + Intensity B).
The color of the greater value is displayed:
- Red as a shade of Red
- Green as a shade of Green
- Blue as a shade of Blue
This formula tends to minimize difference in illumination caused by shadows and uneven surfaces (such as crinkly or curled leaves).
Example: using Red vs Green, if a pixel has 10% Red and 20% Green, the normalized difference is 10% divided by 30% = 0.33. This value is scaled to 33% (between the scale of 0% and 100%) and will be displayed in the computer’s Green.
Based on this image, research is being conducted at the University of New Hampshire to correlate these red vs blue values to the amount of chlorophyll in leaves. Results and conclusions of this work will be posted when completed.
Visible and Near Infrared Photographs
This image, with near infrared displayed as gray, was taken indoors, near a window, during a rainy day. Under the conditions, this is an outstanding photograph!
Using DigitalImageBasics software, the different layers of the visible and infrared photographs were separated and saved as separate images (one for near infrared, one for red, and one for green).
Using SatImageMaker software, the layers were brought together to make an image in the standard NRG Landsat color scheme (near infrared displayed as red, reflected red light displayed as green, and reflected green light displayed as blue light).
For more information, see the guide “Calculate Normalized Difference Vegetation Index (NDVI) from Merged Visible and Infrared Digital Photos“
Using the “Landsat” above image in AnalyzingDigitialImages, calculate and display the Normalized Difference Vegetation Index (NDVI).
The redder the color, the higher the NDVI value (the maximum value is 1, which would be displayed as 100% red, and correlates with very healthy plants). Darker reds indicate that there is less photosynthesis taking place in the leaf. A black or green leaf indicates no photosynthesis is occurring.