TG-PG1-1. Cells on the Grow

{ GSS Teacher Guide Index } { All GSS Books }
Integrating Biology and Algebra
By Dr. Jeffrey Osborn & Antonella Bona (Workshop I)
PART B: Cell culture of human fibroblasts
Overview
Each of you will be given a flask with cultured human fibroblasts. The fibroblasts are attached to the bottom of the flask. They need to be detached with an enzyme, rinsed and centrifuged, and re-suspended in a small known volume of medium. An aliquot will then be counted to determine the concentration of cells, the rest will be plated in culture flasks.
- Cell culture. Human cell cultures need to be incubated at 37 ° C, 5% CO2 . While incubating, cells need to be fed every other day. “Feeding” a cell culture consists in pouring out the old medium, now depleted of nutrients, and adding fresh medium.
- Safety. The cells you are using are free of contaminating viruses and other microorganisms. As a precaution, they require Bio-safety Level 1 containment. You will wear gloves when handling the cultures. You will also wash your hands before you start the experiment and before you leave. NO eating and drinking in the lab.
- Counting cells. You will use a small amount of suspended fibroblasts to figure out the concentration of cells (i.e. amount of cells per unit of volume). You will do this by placing a drop of diluted cells on a hemacytometer. This is a special microscope slide engraved with a fine grid that allows to count cells without losing track. Moreover, with the cover slip in place, the volume is constant, so that the total number of cells in a culture can be calculated.
- Plating cell cultures. Cells can be either harvested directly or obtained trough a supplier. The cells for this lab have been obtained from a supplier. The shipment arrives overnight on dry ice. Upon receipt, the cells need to be either stored in liquid nitrogen for future use or immediately plated. Plating a cell culture requires incubating the cells as described above, in an appropriate medium.
- Sterile environment. Antibiotics are added to the medium to reduce unwanted growth of bacteria in cultures. It is, however, recommended that you use some precautions when working with cells. Keep everything clean and covered as much as possible. When using a sterile pipette, for example, keep it in the wrapper until ready to use it. Do not lay it on the counter or touch it to other objects before use.
- The reagents. Here is a list of reagents and their concentrations, with an explanation of their purpose:
- Minimal Essential Medium (MEM), liquid nutrient mixture to grow cells in.
- Sodium bicarbonate, 1.5 g/l, added to the medium to maintain pH.
- Fetal Bovine Serum (FBS), 10%, added to the medium to provide essential nutrients and growth factors.
- Antibiotics (100 units/ml of penicillin and 100mg/ml of streptomycin) to reduce bacterial growth.
- Trypsin, 0.25%, an enzyme that breaks down the collagen fibers produced by fibroblasts to attach to the bottom of the culture dish. Trypsin, by breaking down the collagen that anchors the cells to the bottom of the flask, will detach the cells and re-suspend them. A culture is trypsinized when it needs to be split (when the cells are confluent, about once every 7-10 days) or at the end of an experiment when cells need to be counted.
- Sodium pyruvate (1 mM) to supplement the energy needs of cells.
- Trypan Blue, a biological stain that attaches to the cell membrane of living cells and allows you to better see them under the microscope when counting them. If the stain enters the cell, then the cell is dead and should not be counted.
- The equipment.
- Inverted microscope. Used to look at cell cultures directly in the flask. The optical components of the scope are under the stage and the light source is above.
- Laminar flow hood. Used to conduct cell culture experiments in a sterile environment.
- Incubator. Used to culture cells in a controlled environment. An incubator allows to set a constant temperature (37°C for human cell cultures) and atmosphere (air with 5% CO2 for human cell cultures)
- Hemacytometer. Microscope slide that allows counting of cells under the microscope thanks to a fine grid engraved on it. The cells, suspended in a liquid, are placed on the edge of the slide, on the V shaped notch, with the cover slip in place. By capillarity, a controlled volume is drawn into the grid chamber. Cells within the central grid section can then be easily counted. A cell counter can help keep track of the number of cells as they are counted.
Procedures
Summary:
Observing live cell cultures under the inverted microscope. Making up cell culture medium. Trypsinizing a cell culture. Plating and incubating cells. Counting cells. Collecting and analyzing final data
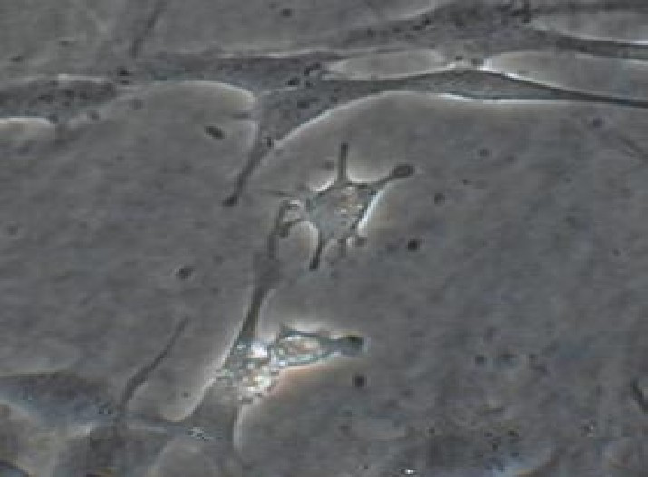
a) Observe human fibroblast in culture under the inverted microscope. Take one of the flasks with cultured fibroblasts from the incubator. This is your supply of cells. Before you add trypsin to detach the cells, observe the cultured fibroblasts attached to the bottom of the flask. This will be done using the inverted scope. Sketch what the cells in the culture look like.
Human fibroblasts in culture.
(b) Make up the medium.
Each group of three will make up 100 ml of MEM. Use sterile glassware and sterile pipettes.
- Place 87 ml of MEM (use a sterile 100 ml cylinder) in a screw cap sterile bottle.
- Add to the MEM
- 10 ml of fetal bovine serum (FBS). Use a 10 ml sterile graduated cylinder.
- 153 mg of sodium bicarbonate. Weigh out the correct amount on a weighing boat and pour into medium.
- 1 ml of antibiotic solution. Use 1000 ml pipettor with blue sterile tips.
- 1 ml of pyruvate. Use same pipettor, with clean sterile blue tip.
- Gently mix by turning capped bottle upside-down a few times. Label the bottle and place it in a water bath set at 37°C.
(c) Trypsinize the cell culture.
Take a tube (orange cap) of trypsin from the water bath, which is set at 37°C.
- Pour the medium out of the culture flask and add 2 ml of trypsin at 37°C. Use a sterile 5 ml pipette and a green pipettor. Swirl the trypsin around the bottom, then immediatelypour it out. This step is necessary to wash off any medium left in the bottle, as the medium contains a trypsin inhibitor.
- Add 3 ml of trypsin. Swirl gently to make sure that the solution covers the bottom of the flask. Observe under the inverted scope. The fibroblasts will detach and become suspended in the solution. Once detached, they will look rounded, not elongated. The cell layer will disperse in 10 to 15 minutes. Once the layer of cells is completely dispersed, stop trypsinization by adding 8 ml of medium.
- Transfer the resuspended cells to a sterile centrifuge tube (orange cap) using a sterile Pasteur pipette. Rinse flask with 1-2 ml of medium. Transfer to centrifuge tube. Cap tube and spin down the cells for 5 minutes in a tabletop centrifuge at low speed, to separate the cells from the medium.
- Discard the supernatant. Remove with a sterile pasteur pipette what is left of the supernatant. Do not disturb the cell pellet. Add exactly 500 ml of medium to the cells, using the 1000 ml pipettor with blue tips
- Vortex the tubes until the cells are evenly distributed in the medium. During centrifugation, cells tend to clump together. Make sure that you thoroughly break up these clumps of cells.
(d) Plate a cell culture.
The medium needs to be added to the flask before the cells. Add to a sterile cell culture flask 10 ml of medium at 37º. Use a 10 ml sterile pipette with pipettor. Vortex the cell suspension. Add 400 ml of cell suspension to the medium in the flask. Cap the flask and immediately place it in the incubator. Within a few hours your cells will be attached to the bottom and the culture will start undergoing cell division at a rate of one division every 24 hours.
Feed cultures. Every 2-3 days (ex: Monday, Wednesday, Friday, Monday) pour the old medium out of the culture flasks and add fresh medium. Use the previously prepared medium warmed up to 37°C.
(e) Count cells. Use what is left of the cell suspension. From this point on you do not have to concern yourself with sterile procedures. The purpose of this step is to find out the concentration of cells in the culture. Counting the initial concentration of the plated cells as well as the final concentration at the end of a week of growth, for example, will make calculating growth rate possible.
- What is left in the centrifuge tube is 1/5 of the whole cell population. Add 400 ml of medium to the centrifuge tube. The total volume will now be 500 ml. This will be the stock suspension.
- Dilute the cells. Do a serial dilution of the cell suspension. Label a set of 3 small plastic test tubes 1:2, 1:4, and 1:8. Add to each tube 0.3 ml (300 ml) of medium with the 1000 ml Pipetter (blue tips). Now add 300 ml of stock cell suspension, from the orange screw cap tube, to the tube labeled 1:2. Gently shake the tube to mix. Keep using the same tip. Take 300 ml from the 1:2 tube and add it to the 1:4 tube. Mix. Take 300 ml from the 1:4 tube and add it to the 1:8 tube. Mix.
- Get microscope and hemacytometer ready. Take the hemacytometer out of the box and gently place the cover slip on it.
- Add the trypan blue stain. Label a tube 1:8 T (1:8 will be the final dilution, T is for trypan blue) and place it behind the 1:4 dilution of suspended cells. Add to the tube 50 ml of trypan blue stain using the 200 ml Pipetter with yellow tips. With a clean tip add also 50 ml of the 1:4 cell suspension. Mix.
- Load the cell suspension in the chambers. Use a pasteur pipet to load both chambers in the hemacytometer. Carefully place a drop of the 1:8 T suspension in the V shaped notch of the slide. The suspension will be drawn by capillarity into the chamber formed by the gridded surface and the cover slip. Repeat on the other side.
- Count cells. Use the 10X objective. Center in your field of view the central square. This square is 1mm2 , and is ruled into 25 groups (5×5) of 16 small squares (4×4). The ruled surface is 0.10 mm below the cover glass, so that the volume of the central square is 0.1 mm3 (see Fig. 1 in results section). Using a cell counter to keep track, count the number of cells in the central grid. You should have approximately 20-50 cells in that area. Check both chambers. If you have fewer than 20, repeat the procedure described above using the 1:2 suspension (label a tube 1:4T, add trypan blue, add suspension, load chamber, count). If you have too many to count, repeat the procedure with the 1:8 dilution (label a tube 1:16T, add trypan blue, add suspension, load chamber, count). If necessary, do more serial dilutions. Clean the slide in between samples using the squirt bottle with ethanol and patting the slide dry with Kim wipes.
- Enter your data in the results section.
- Calculate the initial number of cells in your culture.
- Predict the number of cells there will be in the culture after 10 days if cells undergo cell division every 24 hours. Graph your predictions on a cell number vs. time graph.
(f) Data collection and analysis
A. Trypsinizing the cultures
- Take cell cultures from the incubator.
- Observe cultures under the inverted scope. Record any relevant qualitative observations.
- Pour out the medium. Add 2 ml of trypsin to each flask, whirl around gently and immediately pour out (this step rinses out the medium which has a trypsin inhibitor)
- Add 3 ml of trypsin to each dish; allow trypsin to work for about 10-15 minutes (use the inverted scope to check if all cells have detached).
- Transfer each trypsinized cell suspensions to an orange cap tube with a pasteur pipette. Label the tubes before transferring the suspension.
- Add 2 ml of medium to the culture flasks to rinse out the cells that were not collected the first time. Swirl around gently, then transfer the fluid to correct centrifuge tube with a pasteur pipette.
- Use a tabletop centrifuge to spin down the cell suspension for 5 minutes with a setting of 3 (low). The purpose of this step is to separate the cells from the fluid so that cells can be re-suspended in an accurately measured and consistent volume for counting.
- With a pasteur pipette remove the supernatant from all 5 tubes. Be careful as you get near the bottom. You do not want to disturb the pellet.
- Add to all tubes exactly 1 ml of medium with the 1000 ml pipettor. Cap the tubes and vortex them to re-suspend the cells.
B. Counting the cells.
Prepare a dilution of suspended cells for each tube. Use small plastic tubes. Do a serial dilution of the cell suspension. Label a set of 3 small plastic test tubes 1:2, 1:4, and 1:8. Add to each tube 0.3 ml (300 ml) of medium with the 1000 ml pipettor (blue tips). Now add 300 ml of stock cell suspension, from the orange screw cap tube, to the tube labeled 1:2. Gently shake the tube to mix. Keep using the same tip. Take 300 ml from the 1:2 tube and add it to the 1:4 tube. Mix. Take 300 ml from the 1:4 tube and add it to the 1:8 tube. Mix.
- Get microscope and hemacytometer ready. Take the hemacytometer out of the box and gently place the cover slip on it.
- Add the trypan blue stain. Label a tube 1:8 T (1:8 will be the final dilution, T is for trypan blue) and place it behind the 1:4 dilution of suspended cells. Add to the tube 50 ml of trypan blue stain using the 200 ml Pipettor with yellow tips. With a clean tip add also 50 ml of the 1:4 cell suspension. Mix. Fibroblasts should have a blue outline, as the stain binds to the cell membrane but does not enter into the cells. Totally blue structures are not fibroblasts (they might be fragments of dead fibroblasts, bacteria or dust).
- Load the cell suspension in the chambers. Use a pasteur pipette to load both chambers in the hemacytometer. Carefully place a drop of the 1:8 T suspension in the V shaped notch of the slide. The suspension will be drawn by capillarity into the chamber formed by the gridded surface and the cover slip. Repeat on the other side.
- Count cells. Use the 10X objective. Center in your field of view the central square. This square is 1mm2 , and is ruled into 25 groups (5×5) of 16 small squares (4×4). The ruled surface is 0.10 mm below the cover glass, so that the volume of the central square is 0.1 mm3 (see Fig. 1 in results section). Using a cell counter to keep track, count the number of cells in the central grid. You should have approximately 20- 50 cells in that area. Check both chambers. If you have fewer than 20, repeat the procedure described above using the 1:2 suspension (label a tube 1:4T, add trypan blue, add suspension, load chamber, count). If you have too many to count, repeat the procedure with the 1:8 dilution (label a tube 1:16T, add trypan blue, add suspension, load chamber, count). If necessary, do more serial dilutions. Clean the slide in between samples using the squirt bottle with ethanol and patting the slide dry with Kim wipes.
C. Analyzing the data
Compare the predicted growth curve with the experimental growth curve. Discuss geometric growth.
RESULTS
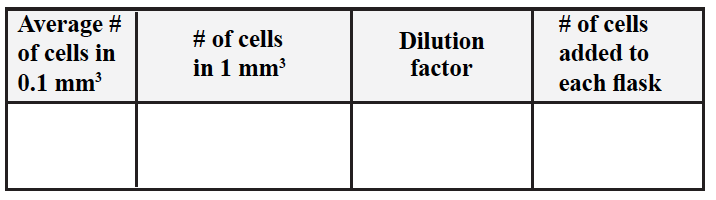
Table 1. Initial Cell Counts

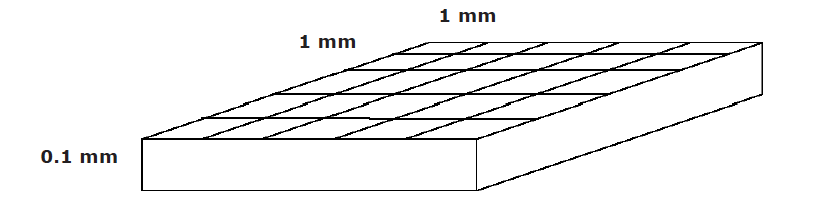
Area = 1 mm x 1 mm = 1 mm3
Volume = 1 mm x 1 mm x 0.1 mm = 0.1 mm3
To calculate the number of cells you added to a culture:
- Average the cell counted in 0.1 mm3
- To obtain the number of cells in 1 mm3 you need to x10 the cell count.
- To obtain the total number of cells added to each of your cultures you need to figure out how many 1 mm3 you have in total (i.e. you need to figure out your dilution factor).
Remember: 1ml=1000 mm3 - Your dilution factor needs to take into account the original volume added to each flask and the further dilution of this volume.
- You need then to multiply the number of cells in 1 mm3 by the dilution factor you just calculated.
Example:
- # of cells counted in 0.1 mm3 = 50
- # of cells in 1 mm3 = 50 x 10 = 500
- # of 1 mm3 of stock present in a 1:4 dilution of 1 ml of cell suspension = 1 ml x 4 = 4 ml 4 ml = 4,000 mm3 the dilution factor is x 4,000
- total # of cells present in each flask: = 500 x 4,000 = 2,000,000= 2 x 10⁶
Table 2. Number of cells added to each flask
Table 3. Final cell counts

Table 4. Number of cells after 1 week of growth